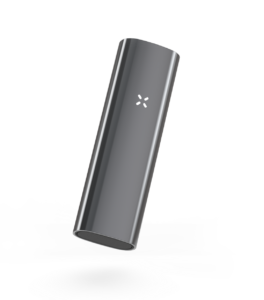
Product Name: PAX 3
Brand: PAX Labs
-
Portability - 9.9/10
9.9/10
-
Functionality - 9.8/10
9.8/10
-
Design - 9.7/10
9.7/10
The PAX 3 vaporizer has been the portable vaporizer we have been waiting for. We’ve covered the PAX 2 which was a well received improvement to its predecessor, the PAX 1, and still a very good vaporizer by all means, but now the PAX 3 has raised the standard even higher. The very first major improvement is the fact that the PAX is now can be used for both herbal material and concentrates. And the second improvement is the heat-up time. So if you’re looking for a highly portable vaporizer with dual capability then the PAX 3 might just be the vaporizer you have been looking for.
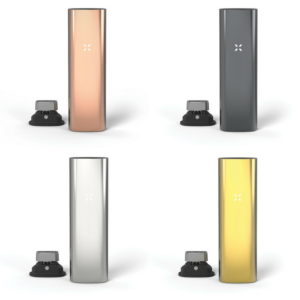
The first decision you will have to make is the color. Similar to the PAX 2, with the PAX 3 there are four available colors to choose from: black, silver, gold and rose gold. All look amazingly good as the high-polished finish really highlights the futuristic, simple and elegant exterior design.
The package is similar to what we have been accustomed to seeing from PAX Labs. A nice outer box that for this model comes packed with a few more items than I was initially expecting. So you will find the following items in the box: the actual PAX 3 vaporizer, two interchangeable mouthpieces, two magnetic oven lids, three screens, a maintenance kit, a multi-tool, two inserts (one standard and one half size for when packing smaller amounts of herbs), a concentrate insert and the charging dock with a USB cable.

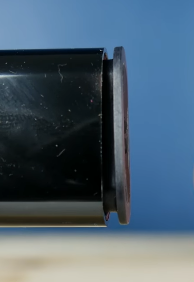
As you unpack it you will notice just how small it is at under 4 inches in height which makes is very portable. Not much has changed in terms of design except for the exterior which is now a high-polish finish which in turn also means it is prone to fingerprints but you can wipe them of easily and the vaporizer looks just like new. It still has only one top button for most of the interaction, the well-known four LED light petals for communicating various things, the motions sensors and what’s new and quite interesting is the haptic feedback which is very nice. We also have an iPhone app to mention and we will see how all these features work a bit later. Overall, from the box to the multi-tool everything gives you the impression of a well-built premium product. It is also very light weight, in fact it’s one of the more lightweight vaporizers from the premium category.
Once you’re done unpacking the vaporizer the first thing that’s recommended you do is to fully charge the unit. The battery is 3500 mAh which is an improvement over the 3000 mAh that the PAX 2 had. A full charge takes around 90 minutes – which last around 100 minutes or around 10 full vaping sessions – and you charge the device with the help of the included charging dock. The PAX 3 also has stand-by features that not only extend the battery life but also ensure you don’t over-burn your herbs.

Again I have to state that I would have liked to see a charge here with the ability to charge the device by directly inserting the plug as with the charging dock – despite it having a magnetic grip – it is rather hard to charge it on the go. But if you’re at home it’s very easy and you don’t even have place it exactly of the dock as the dock stays attached. Once the charging has began the 4 LED lights will turn white and start to pulsate and they will stop once the vaporizer is fully charged.
After charging is done you’re one step closer towards putting this vaporizer to good use. So before I go into how to use the vaporizer, the heating setting and the new app let’s first go over the mouthpieces and the options for the chamber lid.
First you have the mouthpiece option. You can choose the flat one – which I’ve come to like a lot – or you can go for the raised mouthpiece which does take a bit from the vaporizers’ discreetness and sleek design.
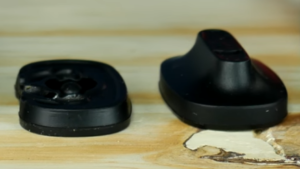
On the opposite side of the mouth piece we have the place where the heating chamber or oven is situated and closed with the magnetic over lids. As mentioned earlier, with the PAX 3 you get 3 magnetic oven lids, two for loose leaf and one for concentrates.
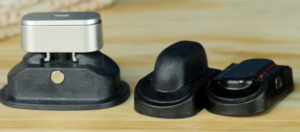
First I’m going to cover the two oven lids for herbs. One is a full pack and one a half pack. What that means is that you have both the option of packing the oven with a more consistent amount of material in order to get a longer session – ideal for a group of people – as well as pack the oven with the perfect amount of material for a session meant just for you.
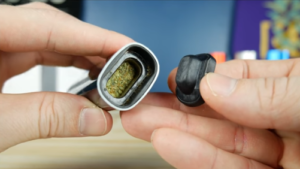
And what is great about this feature is that you can control the amount of herbs in the chamber which lead to more even heating which means better flavor, better vapor and less wasted material. Now, how much material you can pack with both options can vary depending on how finely you grind your material but as a rule of thumb you should be able to fill up the heating chamber with ~0.4g (fine grind and tightly packed) with the normal lid and ~0.2g with the extended lid for packing half the chamber.
Then we have the special lid for the concentrates. It’s a lid on to which you have attached – but it is removable – a small container metal canister where you place your concentrates.
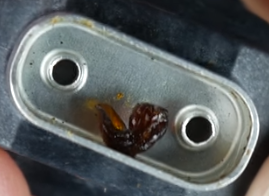
It’s fairly easy to use the only thing required it that you pay attention to the air holes of this container and make sure you do not cover them with the concentrate.
The only thing that is worth mentioning here is that this lid does seem to stick out. That’s the way its supposed to be so don’t worry.
Now that we’re covered how to pack the oven and we have the unit fully charged we can start the vaporizer. We do this by pressing the top button found under the mouthpiece. But before taking a hit I want to talk about the temperature setting.
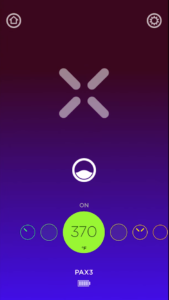
In order to go into temperature setting mode you need to hold the power button for 2 seconds then one subsequent push of a button will scroll through the temperatures. You can also go into temperature setting mode by shaking the device. Exiting the temperature mode is done in the same way, by pushing the button or shaking the device.
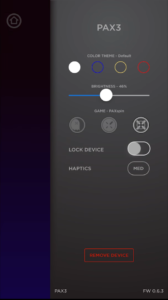
As far as the temperature settings go we have 4 pre-set temperatures and one which we can set ourselves via the smartphone application.
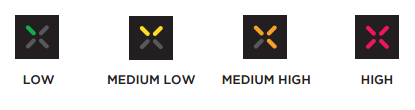
One LED petal lit in the green color indicates the first temperature setting which is 365 F, two petal lights lit in the yellow color indicate the second 380 F setting, three petal lights lit in the orange color represent the third setting which is 400 F and forth setting in when all four LED petals are lit in red and it corresponds to a temperature setting or 420 F. Then there also is the fifth setting which is the custom temperature setting which can only be set via the smartphone app with a range anywhere between 360 F to 420 F.
And speaking of the app, besides manipulating the custom temperature setting you also have the option of changing the color theme, adjust the brightness of the LED petals, lock the device and also set the haptics feedback. It also features three games: PAXruns, PAXsays and PAXspin. Overall it’s a nice addition to the PAX user experience.
Once the temperature is set it’s really time to vape. It is recommended you start with the lowest temperature and work your way up and see what works best for you. The lower temperatures produce the best flavor for herbs while for concentrates it’s recommended you use the higher temperature setting. As the vaporizer heats up the petals will pulsate purple and when it’s green it’s good to go.
One thing you will notice about the heat-up process – especially if you’ve been a PAX 2 user – is that the heat-up time is remarkably short. It took around 60 sec and now the people at PAX Labs have managed to shorten that time and now the heat-up process only takes around 15 second. That is a great and well received improvement.
The smoke and vapor for the the herbal material is some of the best you will get from any vaporizer. Smooth and cool smoke and the PAX 3 also improved on the pull resistance from the PAX 2. What I liked is that PAX knows when I’m taking a hit or when I’ve placed the unit down, due to it’s motion sensor built in technology .I get even draws and knows when to heat the oven so that I get the best possible overall experience. I really enjoy my vaping sessions with the PAX 3.
However the concentrate experience wasn’t as great, with the heating process taking a bit longer – maybe I should have waited even more – and the taste not being all that great. But overall the concentrate chamber did work fine.
With each vaporizer I take the cleaning process in consideration as well. In order to get the best results you need to keep the vapor path and oven screen residue-free. With the PAX 3 the cleaning process is relatively easy as they included all the tools you need in the package. It is recommended you clean the oven after each session and every few session you should clean the vapor path by removing the mouthpiece, the oven lid and the oven screen and use one of the included pipe cleaners (dipped in isopropyl) to scrub the vapor path of any built-up residue. You also have the included wire brush for heavier cleaning if necessary.
I liked the PAX 2 for a lot of reasons and I like the PAX 3 even more. Overall it has improved in almost every aspect and the smooth smoke and functionality has won me over. The 10 year warranty only gives me an extra reason to like this vaporizer and feel at ease if something goes wrong with the device. This is definitely one of the best portable vaporizers on the market right now and I fully recommend it.